


Learning how to draw a dog can be a rewarding and enjoyable experience, whether you are a beginner or an experienced artist. This guide will walk you through the process of drawing a dog in a few simple steps. By breaking down the process into manageable stages, you’ll be able to create a beautiful and realistic dog drawing. Let’s get started!
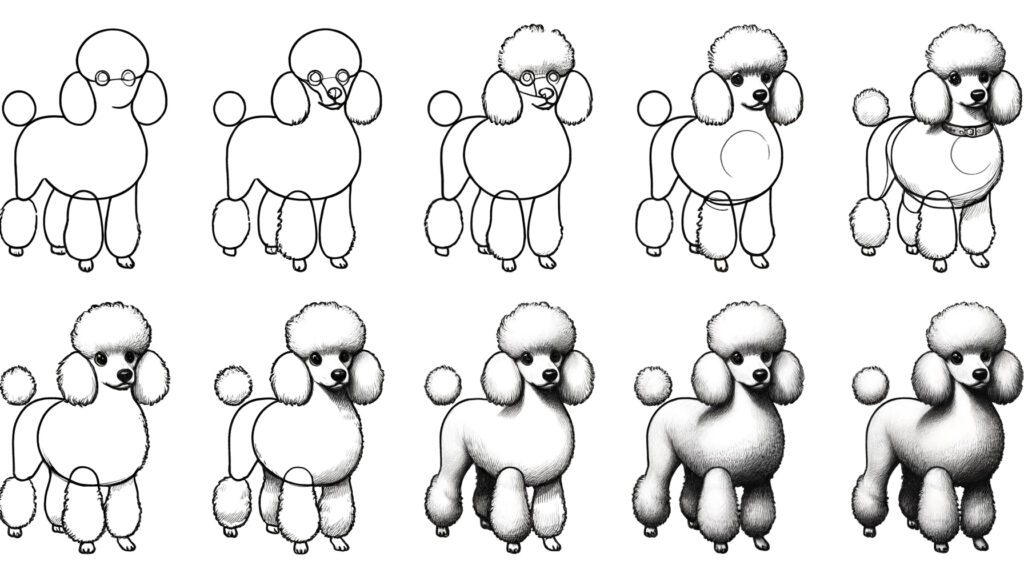
Step 1: Basic Shapes and Outline
Begin by sketching the basic shapes that will form the foundation of your dog drawing. Use a light pencil so you can easily erase and adjust as needed.
- Head and Body: Draw an oval for the head and a larger oval for the body. These shapes don’t have to be perfect; they are just guides.
- Guidelines: Add a vertical and horizontal guideline across the head oval to help place the facial features accurately.
- Ears and Snout: Sketch two triangular shapes on top of the head for the ears. For the snout, draw a small oval that overlaps with the lower part of the head oval.
Step 2: Adding Details to the Head
Now that the basic shapes are in place, it’s time to add details to the head.
- Eyes: Draw two circles on the horizontal guideline for the eyes. Make sure they are evenly spaced and roughly the same size.
- Nose: At the bottom of the snout oval, draw a small triangle for the nose. Round off the corners slightly to make it look more natural.
- Mouth: From the bottom of the nose, draw a short line downwards, then curve it into a smile or neutral expression.
- Ears: Add details to the ears by drawing the inner lines to define the shape and structure.
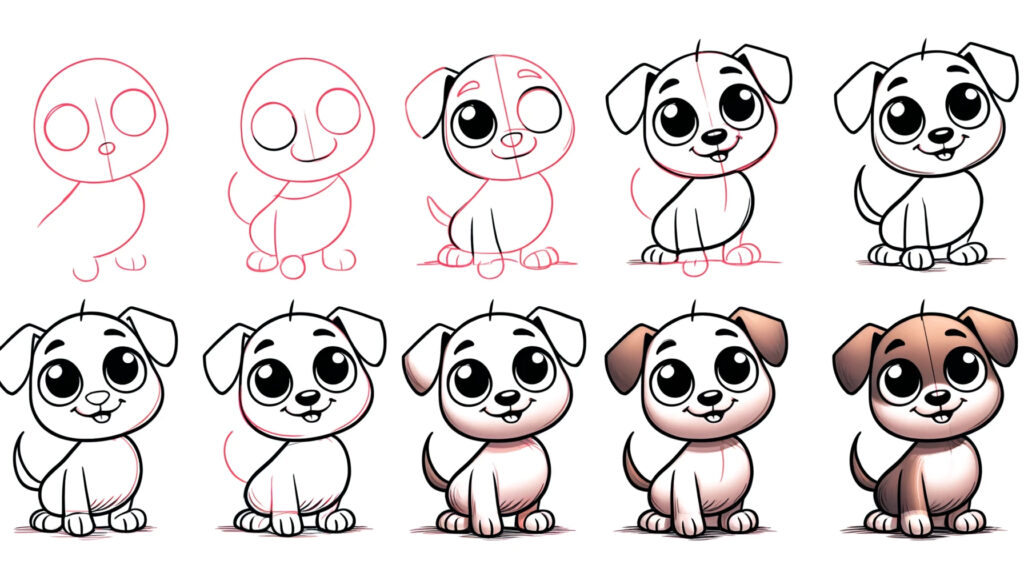
Step 3: Detailing the Body
With the head details in place, focus on the dog’s body.
- Neck and Shoulders: Connect the head to the body with two curved lines for the neck. Then, add two more lines to define the shoulders.
- Legs: Draw the front legs as two parallel lines extending down from the shoulders, with small circles at the joints for the elbows. The back legs should be slightly bent and drawn similarly, with circles for the knees and ankles.
- Tail: Sketch a curved line for the tail. Depending on the breed of the dog, the tail can be long and straight, short and curled, or anything in between.
Step 4: Adding Fur Texture and Shading
To make your dog drawing look more realistic, add fur texture and shading.
- Fur Texture: Use short, quick strokes to create the appearance of fur. Follow the natural direction of the fur growth, which typically flows from the head towards the back and down the legs.
- Shading: Add shading to give your drawing depth. Identify the light source and shade the areas that would be in shadow. Common areas to shade include under the ears, around the eyes, under the body, and on the legs.
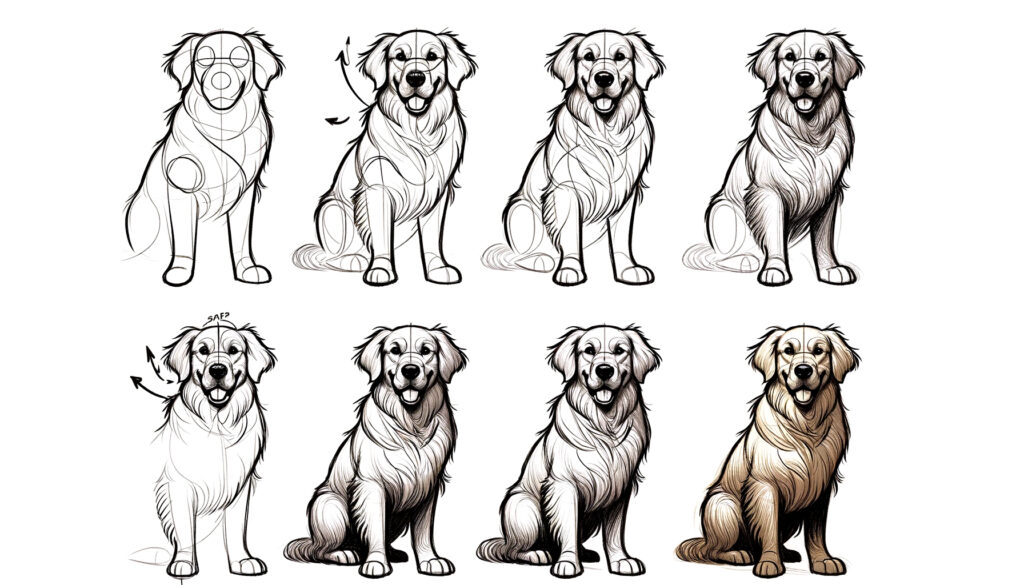
Step 5: Finalizing the Drawing
Now it’s time to refine your drawing and add the final touches.
- Refining Lines: Go over your lines with a darker pencil or ink pen to make them more defined. Erase any unnecessary guidelines and sketch lines.
- Adding Details: Add any final details, such as whiskers, individual strands of fur, and highlights in the eyes to make them look more lively.
- Background: If you want, you can add a simple background to give your drawing context. It could be as simple as a patch of grass, a park, or even just a shadow beneath the dog to ground it in space.
Tips for Drawing Dogs
- Observe Real Dogs: If possible, observe real dogs or use photographs to understand their anatomy and movements better.
- Practice Different Breeds: Different dog breeds have distinct features. Practice drawing various breeds to improve your versatility.
- Take Breaks: Drawing can be intensive. Take breaks to rest your eyes and hands.
- Be Patient: Don’t rush. Take your time to ensure each step is completed accurately.
- Use References: Having reference images can help you understand proportions and details better.
Woof. Woof.
Drawing a dog may seem challenging at first, but by breaking the process down into manageable steps, you can create a beautiful and realistic drawing. Start with basic shapes, add details, and gradually build up the texture and shading. Practice regularly, and don’t be afraid to experiment with different breeds and poses. With time and patience, you’ll see significant improvement in your drawing skills. Enjoy the process and happy drawing!